Thursday, January 22

Winter Maxi Skirt Tutorial


Who says that maxi skirts are just for the summer? I saw a sweater paired with a maxi skirt on Pinterest and I fell in love. After going to the fabric store and finding this beautiful deep purple fabric, I knew that it was meant to be. If only we had a little snow on the ground to make the pictures complete.  

Supplies:
About 1 yard to 1 1/2 yards of fabric depending on your height.(I used about a 1 1/3 yard because I measured and need the skirt to be 42 inches long)
Sewing pins
9 inch zipper
Fabric scissors
Sewing Machine
Measuring Tape
Ruler or Cutting board with measurements marked

1. The first thing you need to do is measure how long you want the maxi skirt to be. Start by putting the measuring tape wherever you want the skirt to sit on your waist. Remember that we are going to sew a band around the top. Measure all the way to the floor. After you get this measure add about 2 inches for the hem and seam allowance for the band at the top. this is the length that you want your fabric. The width does not matter because we are going to pleat the skirt.

2. Okay, now that you've figured out how much fabric you need, lay the fabric out on a flat surface or cutting board. This purple fabric is a lightweight cotton. It is a little thicker so I didn't need any lining.


3. Instead of gathering the waistline, I decided to pleat it. This is a diagram on how to pleat fabric.


How To Pleat Fabric:
1. Mark where you want your pleat to be (31 on my cutting board)
2. Decide how big you want your pleats to be. Mine are 2 inches.
3. Pinch the fabric at the second mark (on my cutting board, this was at 33)
4. Take what you've pinched and fold it over till it reaches the first mark you made (31 on my cutting board)

4. Now that you've got the fabric pleated, baste across the pleats to keep them in place.


5. Cut the waistband of the skirt. Measure around your waist and add 1 inch seam allowance for the zipper. I cut the waistband about 5 inches wide. This leaves 1 inch for seam allowance and the rest is folded in half so when we finish the waistband should only be about 2 inches.


6. Iron the waistband in half and then 1/2 inch on each side for the seam.


7. Pin the waistband to the pleated skirt right sides together. Sew along the ironed fold.


8. Pin the skirt together along the side with right sides together. This skirt only has one seam. Mark 9 inches down from the middle fold in the waistband to leave room for the zipper.


9. Pin the zipper in and sew.


10. On the underside, pin the waistband down. Stitch along the seam.


11. Lastly, pin the hem and sew. My hem was about 1 1/4 inch with the 1/4 inch being folded under to prevent fraying.


Thursday, January 15

Jean Jacket with Hoodie DIY


I have wanted to buy one of these every time I see it in the store, but every time my inner mom comes out and I think, You already own tons of hoodies. Finally, I thought, I can just make one. I had a jean jacket in the back of my closet that I had gotten as a hand-me-down, but never worn and a thrift store grey hoodie and I was ready.

Supplies:
Hoodie or zip-up jacket
Jean jacket
Scissors
Sewing machine
Sewing pins

Start off with a hoodie or zip-up jacket and a jean jacket. Here's what mine looked like before.


Cut the sleeves off of the jean jacket. Cut right along the seam but do not cut on the seam because then you will have to deal with an unfinished edge.

Next, stuff the hoodie or jacket you are using inside the jean jacket.

Pin it along the bottom. Make sure to try it on first. On mine, the grey jacket hung out a little under the jean jacket so I measured how low it hung then pinned it.

Also, pin the hood to the collar. Sew these two sections and then try the jacket on before pinning around the sleeves and sewing. When sewing this together, it was very thick and I had to use my industrial sewing machine to sew it. I used a golden yellow thread to match the stitching already on the jean jacket and just sewed directly on top of the existing stitching.


I hope you enjoyed this DIY and have a wonderful weekend!


Tuesday, January 13

Collars, Collars, Collars

If you have a open neckline and want something a little different, these collar necklines are the perfect thing for you. My favorite way to wear them is with a strapless dress. They are great for filling in a neckline and can add flare to any outfit.


My Inspiration:
                    If your dress doesn't have a collar, put one on. | 23 Ways To Glam Up Your Little Black Dress


I found this really cute sheer Forever XXI shirt at the thrift store but it had a rip in it. It had a really cool collar though so I kept it until I found this perfect project. This one was my test dummy and I used it to make my first collar necklace. 


I simply cut off the collar right next to to the seam so the edge will already be finished for us. 


That's all for this one! Super easy.


For this one I decided to go I little bit more girly. Start the same way as the first one by cutting the collar off of a shirt. My mom gave me a bunch of collared shirts from her work when the company changed names so I had a lot of color choices to work with. I chose a white and I had pearl beads. Using a hot glue gun, I created little triangles on the tips of the collar.


This one was another really fun one. I channeled my inner rocker and bought some stud beads from my local craft store. Using the hot glue gun again, I glued the studs in a checkered pattern.


Last but not least, this simple one. I took the collar off of a black textured shirt (you can't see the texture in this picture). I found this really cool button with a marbled inside to stitch in the middle and accent the collar. Another approach instead of a button would be a brooch or another large circular piece of jewelry.


Friday, January 9

DIY Boot Cuffs


I'm back to doing DIYs with sweaters. Today it's boot cuffs! These are really simple and an awesome way to accessorize your boots this winter.


These boot cuffs were super easy. You can simply buy a thrift store sweater and cut off the sleeves. That's it! All done!


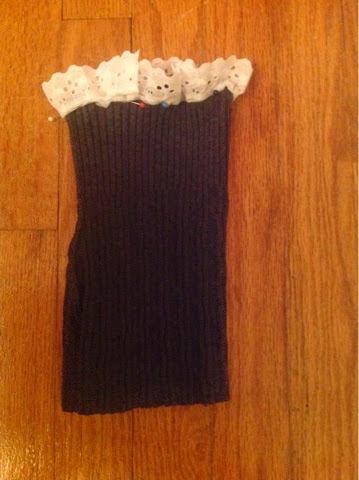
For this set of boot cuffs, I started with another sweater. This is the remainder of the sweater I used to make my sweater skirt. For these boot cuffs, you are also going to need, eyelet lace trim and buttons.


1. Cut the sleeves off of the sweater at a straight angle.


2. Determine how long you want the boot cuffs to by. This is totally up to you; they can be long and cover your whole leg under the boot or they can just be a couple inches into your boot. After sliding the sleeve on my leg, I decided that I wanted the cuff to be shorter, so I cut off some of the sleeve.


3. In order to determine how much lace you are going to need, measure around your calf where you are going to wear the cuff. Around my calf was about 17 inches. I cut the lace to about 18 inches so it would overlap a little bit. 


4. To pin the lace, you are going to need to either stretch the sweater as you pin the lace or pin the lace onto the sweater while it is on your calf. Unless the lace you bought was elastic, it will not stretch with the sweater. This is why you must stretch the sweater as you pin the lace. after pinning, sew the lace to the sweater.


5. Next, I took some white buttons and placed them on the boot cuff. Sew.


That's all! Hope you enjoyed this super simple and quick DIY.