Thursday, October 30

Catwoman: DIY Cat Ears

"I am Catwoman. Hear me roar."


Catwoman is the final part of our evil trio. For the outfit we used a leather jacket, lace up boots, a black tank top, and black leggings. 


To make the ears I used a few simple supplies.
Supplies:
Pinking shears 
Sewing pins
Hard skinny headband
Black fabric
Paper diamond (to use as a pattern)
Sewing machine 


1. Pin the diamond to the black fabric.(I just printed a diamond picture off of google for my diamond)


2. Cut out around the diamond. I used my pinking shears to create a different look, but you can use regular scissors.


3. Fold the diamonds in half to create a triangle. After folding the diamonds into triangles, I thought the edges were too sharp so I cut the triangles with a more curved edge.


4. Sew a slit at the bottom of the ears, big enough for the headband to slide through, but not to big that the ears will slide off. Sew around the outside edge of the ears, but don't sew through the slit. (The dotted lines are where my stitches are)


5. Slide the ears on the headband and you're done!


Here's a finished pic of the ears! Happy Halloween everyone! 👻🎃🍭


Tuesday, October 28

DIY Poison Ivy Costume

"I think I've had a change of heart. Quite literally. The animal-plant toxins had a rather unique effect in me. They replaced my blood with aloe, my skin with chlorophyll, and filled my lips...with venom. Oh, and Jason, one other thing. I probably should have mentioned this earlier. I'm poison."


     Poison Ivy is one of the stunning villains in the Batman universe. Normally she is featured wearing a green leaf covered leotard with green tights. For our high school purposes, we decided to change it to a leaf covered dress with green tights and a fitted green long sleeve underneath. 


Supplies: 
Tight fitting dress (preferably green but we worked with black)
A lot of fake leaves
Hot glue
       
1. First, we went thrift shopping for a tight fitting dress. We weren't able to find green, but we found black and we covered it in enough leaves that you can't even tell, so it's totally up to you and what you  are able to find.


2. The next thing we did was glue leaves all over the dress using the hot glue. Start glueing along the bottom edge and work your way up the dress, making sure that all the leaves are facing the same direction to give the dress a smoother look. If you're glueing on a flat surface make sure to put something in between the front and back so the dress does not get glued together. You could also glue the leaves on while the dress is on the person or use a mannequin. This insures that leaves cover the entire dress while it is stretch over the body. 
Note: if you glue the leaves on the dress on a flat surface, leaves may fall off when the person is wearing the dress because it is stretched on the person's body.


     You can also take extra vines of green leaves and wrap them around your head to create a headband or around your wrist for bracelet. Add green eyeshadow and red lipstick to complete your look! 


Thursday, October 23

Harley Quinn Costume Part 3: Two-Tone Tights

Now for the final part of the costume, the tights! The tights are optional but can really help if you plan on being outside. These were by far the easiest part.


Supplies:
Red tights
Black tights
Scissors
Sewing pins
Sewing machine

First, you're going to need two pairs of tights, one red and one black. The red ones I bought from JCPenney and the black ones I already owned. (Hint: tights with a hole in one leg are perfect for this.)


The next thing you're going to do is to cut both pairs of tights in half along the seam.


Then take one leg from each pair of tights so you have two different colors. Pin then together along the seam.


Sew them together and you're done! 

I continued Harley's cute look with booby socks and black flats. Now the look is complete, I hope you enjoyed it and have a Happy Halloween!

Tuesday, October 21

Harley Quinn Costume Part 2: Jester Collar

The jester collar is a central part to the traditional Harley Quinn costume. It was simple to make and can complete your Harley Quinn costume.


Supplies:
Scissors
Triangle pattern
Pencil
Sewing machine
1 yd white fabric
Measuring tape
Bells or white puff balls (optional)

First, before you do anything else, measure around your neck. Then, you're going to need to do a little math and find the radius of your neck in order to make a circle.

1. Fold your fabric in half and then in half again hot dog style. Find the middle of the fabric and mark it. Use your measuring tape to mark the radius and creating a half circle.

2. Put the triangle pattern in the middle of half circle and trace with the pencil.

3. Place the triangle to the side and mark

4. There should be 3 triangles. Cut it out and you should have two 


5. Cut out a rectangle the length of you neck plus one inch and the width 3 inches.


6. Iron interfacing to one side on the collar.
       
7. Pin the other collar piece on top of the one with the interfacing, right sides together. Cut a slit in the collar between two of the triangles. Sew them together.

      
8. Once the two pieces of the collar has been sewed together, turn the right sides out and stitch around the outside.


9. Fold the rectangle piece we cut in half and iron.


10. Pin the folded rectangle piece and the collar together. Remember that the rectangle will be slightly larger them the edge of the collar. Sew.


11. Cut Velcro squares and attach them to the ends of the rectangle sewed around the top of the collar.


12. The last step is adding bells or white puff bells to the ends of the points on the collar. I used fabric glue to attach white puff balls.

Finally to finish the look where your hair in Harley's two high ponytails, red lipstick, and black eyeliner.

Monday, October 20

Harley Quinn Costume Part 1: The Dress

"A-okay, Mr. J!"

Harley Quinn is the crazy sidekick of the Joker and I decided she was the perfect character for me to be for Wicked Wednesday. I knew that just Harley Quinn might work on her own but if I could gather a group of friends and make the Gotham Sirens, I knew we could be absolutely lethal.


So here we are, the Gothem Sirens! In the couple of weeks before Halloween, I decided to show how to make these costumes so that everyone can be positively evil.

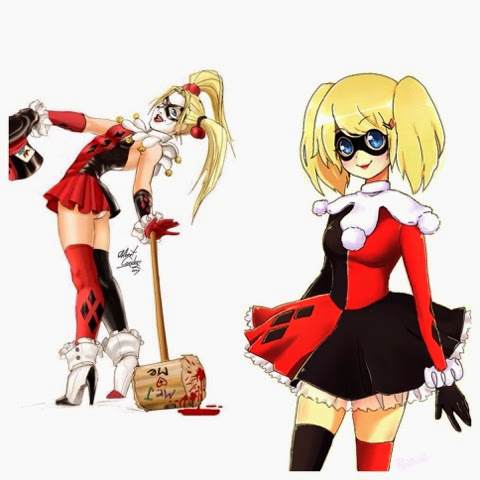
Instead of the typical Harley Quinn jumpsuit, I decided to do a cute little dress. I used these two pictures as my inspiration.

                    
And here's how it it turned out! (Ignore my awkward faces) 


Supplies:
2 yd of red stretch cotton
2 yd of black stretch cotton
White lace 
3/4 inch Elastic
16 inch black or red zipper
Thread
Sewing machine
Sewing pins
Parchment or pattern-making paper
Fitted t-shirt
Measuring tape
Fabric chalk
Pencil
Sleeve pattern

1. So for the first part I made a circle skirt. To do this your going to need to measure your waist and find the radius which you will mark and cut out. Here's an example of how I used the circumference formula to find the radius of my waist.

      
2. Fold the black fabric in half and mark the radius you found from the corner. Measure the length you want on yourself then add it to the radius previously marked. Use this measurement to mark another arch.


3. Repeat with the red fabric. Cut both of the half circles out.


4. Pin the two half circles together along the sides with right sides together. Sew.


5. Now for the top. I used a fitted t-shirt as a pattern. Fold the t-shirt in half and trace its outline on parchment or pattern-making paper. Cut out the pattern.
                       

6. Place the pattern on the red and black fabric. Cut two of each color.


7. Take one piece of each color and pin them together. Sew.


8. Pin the other two pieces to the front piece along the sides and top of the shoulders.


9. Pin the skirt to the top making sure that the colors are opposite one another on the skirt and the top.


10. Mark 1 inch down on the seam you just sewed on the skirt. Pin it and sew. This will be a slot for the elastic.


11. Pin the slot you just created to the top and sew it down.


12. Measure how much elastic you will need to hold the dress tight around your waist. Usually 2-3 inches less then your waist depending on the stretch of your elastic. Put the elastic through the slot and sew it together at the ends.  


13. Pin the zipper in the back and sew.


14. Using a sleeve pattern, pin and cut one of each color.


15. Using a picture of a diamond that I printed from Google images I cut Harley Quinn's three signature diamonds and pinned them onto the sleeve. Sew. You can also make red diamonds for the black sleeve.


16. Fold the sleeves in half with the right sides together and sew.


17. Pin the sleeve into the armhole and sew.


18. Hem the sleeve with white lace. I used lace to take the place of Harley Quinn's big cuffs.


19. Pin the edge of neckline down and sew.


20. Cut more diamonds, slightly bigger for the skirt. Pin and sew.


Finished! Keep watch for tutorials for the other parts of the costume. Meanwhile, I hope you have a postively wicked day.